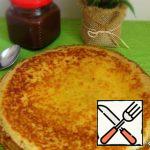
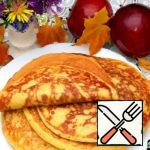
Delectable, golden-brown, made from simple ingredients—perfect for breakfast! Milk pancakes, thin with a delightful layer of holes, are just as easy to cook as any other variety. These pancakes are enjoyable both with and without fillings. Whether sweet or savory, they pair well with various sauces, offering a versatile and delicious breakfast option.

| Prep Time | 15 minutes |
| Cook Time | 1 hours |
| Servings |
|
Ingredients
- 500 milliliters Milk
- 2 pieces Eggs
- 160 gram Wheat flour / Flour
- 2 tablespoon Sugar
- 70 gram Vegetable oil additionally for greasing the pan
- 0.5 teaspoon Soda
- 1 tablespoon Vinegar 9%
- Salt to taste
Ingredients
|
|
Instructions
- Begin by gathering all the necessary ingredients for making thin pancakes with holes. I recommend using milk with 2% fat content and eggs of category C1. Pre-sift the flour through a sieve in advance to infuse it with oxygen.

- For the pancake batter, choose a deep bowl to prevent splashes during kneading. Combine eggs with sugar and salt in the bowl. In a separate container, mix flour and baking soda.

- Pour milk into the bowl with the eggs and gradually add the flour and baking soda, kneading the dough.

- Incorporate vegetable oil into the dough and add vinegar. Ensure all ingredients are well mixed, and you can use a mixer for this. The finished dough should be uniform without any flour lumps.

- The pancake batter should be relatively liquid for thin pancakes. Allow it to stand for 5 minutes, letting the vinegar and soda react, leading to the appearance of bubbles on the surface.

- Heat a pancake pan to a hot state for frying, applying a thin layer of vegetable oil using a napkin or brush. The pan should be well-heated. Quickly pour a thin layer of dough onto it, as these thin pancakes cook rapidly. Fry the pancakes on both sides until they achieve a golden brown color.

- Stack the completed pancakes on a separate plate and keep them covered to prevent drying out.

- These pancakes feature numerous holes, making them less suitable for wrapping fillings. However, they are delicious when dipped in sour cream, condensed milk, or jam.

- Enjoy your delightful treat!


Recipe Notes
Determining the freshness of an egg is crucial. Here's how to do it: Crack the egg into a separate container. Firstly, check for any unpleasant odor. Fresh eggs will have a transparent and clean egg white, while the yolk should be shiny, convex, and homogeneous.
Before use, it's essential to wash the eggs. Even if the shell appears clean, harmful bacteria may be present. Optimal cleaning involves using food detergents and a brush.
Keep in mind that the amount of flour needed may vary from the recipe. Instead of strictly adhering to the specified quantity, focus on achieving the desired consistency of the dough. Adjust the flour accordingly to achieve the best results.
Related posts:
 Thin Pancakes with Melted Milk Recipe
 Thin Pancakes Recipe
 Pancakes with Strawberries and Condensed Milk Recipe
 Corn Pancakes on the Fermented Baked Milk Recipe
 Thin Pizza Dough Recipe
 Melt Pancakes with Pecan Condensed Milk Recipe
 Vanilla Pancakes on Milk Recipe
 Pancakes with Strawberries and condensed Milk Recipe
 Pancakes on the Fermented Baked Milk and Kefir Recipe
 Carrot Pancakes with Sour Milk Recipe
 Dough for Very Thin Pizza Recipe
 Cheese Chips made of Thin Yeast-Free Pita Bread Recipe