Print Recipe
American Donuts
Original, lush, mouth-watering, just melt in your mouth! American Donuts is a classic recipe for a famous dish. They are made from yeast dough, deep fried, and then covered with icing, chocolate or simply sprinkled with powdered sugar. The process is long, but simple.
Prep Time 15
Cook Time 2.5
Passive Time 1.5
Servings
Ingredients
For donuts:
For deep frying:
For the glaze:
Prep Time 15
Cook Time 2.5
Passive Time 1.5
Servings
Ingredients
For donuts:
For deep frying:
For the glaze:
Instructions
  1. How to make American Donuts Donuts? Prepare the products. Remove the butter from the refrigerator in advance so that it becomes soft. The egg should also be at room temperature. Sift the flour in advance. It is important to sift the flour to saturate it with oxygen. Then the baking will turn out to be airy and will rise well when baking. The amount of oil for deep frying is approximate, focus on your dishes.
    How to make American Donuts Donuts? Prepare the products. Remove the butter from the refrigerator in advance so that it becomes soft. The egg should also be at room temperature. Sift the flour in advance. It is important to sift the flour to saturate it with oxygen. Then the baking will turn out to be airy and will rise well when baking. The amount of oil for deep frying is approximate, focus on your dishes.
  2. Heat the water to a warm state, pour yeast into it. Mix them well with a spoon. Leave for 10 minutes to activate the yeast. They should bubble up.
    Heat the water to a warm state, pour yeast into it. Mix them well with a spoon. Leave for 10 minutes to activate the yeast. They should bubble up.
  3. Break an egg into a bowl, add sugar and soft butter. Pour in the yeast mixture. Be sure to wash the eggs before use, as even the seemingly clean shell may contain harmful bacteria. It is best to use food detergents and a brush.
    Break an egg into a bowl, add sugar and soft butter. Pour in the yeast mixture. Be sure to wash the eggs before use, as even the seemingly clean shell may contain harmful bacteria. It is best to use food detergents and a brush.
  4. Add half a serving of flour — 170 grams. Knead the dough using a mixer with bread attachments.
    Add half a serving of flour — 170 grams. Knead the dough using a mixer with bread attachments.
  5. Knead the dough for about two minutes. If you don't have a mixer, it doesn't matter, knead with your hands, it just takes longer.
    Knead the dough for about two minutes. If you don't have a mixer, it doesn't matter, knead with your hands, it just takes longer.
  6. Heat the milk to a warm state. Pour it into the dough. Continue kneading.
    Heat the milk to a warm state. Pour it into the dough. Continue kneading.
  7. The products should be completely mixed, you will get a fairly liquid mass.
    The products should be completely mixed, you will get a fairly liquid mass.
  8. Add the remaining flour. Knead the dough until smooth and smooth. It will take about 5 minutes. The dough will be sticky, as it should be.
    Add the remaining flour. Knead the dough until smooth and smooth. It will take about 5 minutes. The dough will be sticky, as it should be.
  9. Assemble it into a ball. Cover the bowl with a towel or foil and put it in a warm place for an hour and a half to rise.
    Assemble it into a ball. Cover the bowl with a towel or foil and put it in a warm place for an hour and a half to rise.
  10. The dough will double in volume during this time. Remember it a little — it will become small again. Separate a small piece — about a third or a quarter. It will be more convenient to work with him.
    The dough will double in volume during this time. Remember it a little — it will become small again. Separate a small piece — about a third or a quarter. It will be more convenient to work with him.
  11. Sprinkle the board with a small amount of flour. Roll out a piece of dough into a 1.5 cm thick layer. The dough is not so sticky anymore, it is easy to work with.
    Sprinkle the board with a small amount of flour. Roll out a piece of dough into a 1.5 cm thick layer. The dough is not so sticky anymore, it is easy to work with.
  12. With the help of improvised tools, cut out large mugs, I have them 8 cm. I cut the lid from the jar, you can take a thin glass. Then cut out a circle in the middle, I took the bottle cap. Now they sell special molds for donuts, it's much more convenient. But, in the absence, you can do with improvised means.
    With the help of improvised tools, cut out large mugs, I have them 8 cm. I cut the lid from the jar, you can take a thin glass. Then cut out a circle in the middle, I took the bottle cap. Now they sell special molds for donuts, it's much more convenient. But, in the absence, you can do with improvised means.
  13. Take a suitable deep-frying dish, I have a good old cauldron, it heats up perfectly and keeps warm. Pour about 2.5 cm of oil into it. Heat the oil well. You can check the readiness of the oil with a wooden stick dipped into it — bubbles will run from it. Put the donuts in the deep fryer. Do not put a lot at once — they will grow when frying.
    Take a suitable deep-frying dish, I have a good old cauldron, it heats up perfectly and keeps warm. Pour about 2.5 cm of oil into it. Heat the oil well. You can check the readiness of the oil with a wooden stick dipped into it — bubbles will run from it. Put the donuts in the deep fryer. Do not put a lot at once — they will grow when frying.
  14. Fry the donuts over low heat until golden brown. The donuts will need to be turned over a couple of times so that they are evenly fried.
    Fry the donuts over low heat until golden brown. The donuts will need to be turned over a couple of times so that they are evenly fried.
  15. Put the finished donuts on a plate with a paper towel — it will absorb excess fat. Fry all the donuts in the same way. I cut them out while one portion was frying. Do not throw away the circles from the middle - fry them at the end. I made bigger balls out of the scraps and fried them at the end. It turned out to be completely waste-free.
    Put the finished donuts on a plate with a paper towel — it will absorb excess fat. Fry all the donuts in the same way. I cut them out while one portion was frying. Do not throw away the circles from the middle - fry them at the end. I made bigger balls out of the scraps and fried them at the end. It turned out to be completely waste-free.
  16. Prepare icing by gradually adding milk to powdered sugar until a thick consistency is achieved. Coat the donuts with the icing using a spoon.
    Prepare icing by gradually adding milk to powdered sugar until a thick consistency is achieved. Coat the donuts with the icing using a spoon.
  17. Optionally, sprinkle pastry sprinkles on top of the glazed donuts for decoration.
    Optionally, sprinkle pastry sprinkles on top of the glazed donuts for decoration.
  18. Serve the freshly glazed donuts and enjoy your delicious treat!
    Serve the freshly glazed donuts and enjoy your delicious treat!
Recipe Notes

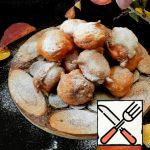
From this batch of dough, I ended up with 11 full-fledged donuts and plenty of leftover rounds, which I simply dusted with powdered sugar. We preferred the glazed ones, though. However, this glaze isn't perfect, so I'll be on the lookout for a better recipe.

The liquid used to activate the yeast should be warm to the touch, no higher than 40 degrees Celsius. This temperature is crucial because yeast activates well in a warm environment, dies in a hot one, and simply won't work in a cold one.

When frying, use oil with a high smoking point! All oils are only safe up to a certain temperature, known as the smoking point, beyond which they start to burn and release toxic substances, including carcinogens.
Unrefined oils, with few exceptions, have a low smoke point because they contain many unfiltered organic particles that burn quickly.
Refined oils are more heat-resistant, with a higher smoke point. If you're cooking in the oven, frying pan, or on the grill, ensure you use oil with a high smoking point. The most common oils with high smoking points are refined varieties of sunflower, olive, and grape seed.

Be prepared for the fact that you may need more or less flour than indicated in the recipe. Focus not on the amount of flour, but on the desired consistency of the dough.

0 0 votes
Article Rating
Subscribe
Notify of
guest
0 Comments
Inline Feedbacks
View all comments