
| Prep Time | 2 minutes |
| Cook Time | 10 minutes |
| Servings |
- 70 gram Flour wheat / Flour
- 2.5 tablespoons Sugar
- 2 teaspoons Cacao powder
- 2 tablespoons Vegetable oil
- 9 tablespoons Milk
- 1 teaspoons Baking powder
- Salt to taste
- 10 gram Dark chocolate
- 0.5 teaspoons Powdered sugar
Ingredients
|
|
- How to bake a chocolate cupcake in a mug in the microwave? Gather all the necessary ingredients. Opt for high-quality wheat flour and sift it into a bowl. Add baking powder to ensure the cupcakes rise perfectly. For insights into baking powder, refer to the article linked at the end of the recipe.

- Introduce granulated sugar, cocoa powder, and a pinch of salt into the bowl to enrich the cupcakes' flavor. It's advisable to sift the cocoa powder to avoid lumps in the dry mixture.
- Thoroughly blend the dry mixture until all the ingredients are uniformly combined. Voila! You now have a cupcake mix ready, akin to store-bought ones! Consider preparing a larger batch of mix in advance and simply add the liquid component when ready to use. This can significantly expedite the dessert-making process.
- Pour in the milk and vegetable oil, then stir the mixture until it reaches a smooth consistency. Adjust the flour quantity as needed, focusing on achieving a medium-density, fluid-like dough. Refer to a separate article at the end of the recipe for insights into flour properties.
- Grease the bottom of microwave-safe mugs with sunflower oil. Ensure the mug walls remain dry! I typically use standard ceramic mugs with a 360 ml capacity. Pour approximately one and a half tablespoons of batter into each mug.
- Optionally, place a small piece of bitter or milk chocolate in the mugs for a gooey center, as shown in my photo. However, this step is entirely discretionary! You can evenly distribute all the batter among the mugs without adding chocolate.
- Distribute the remaining batter evenly over the chocolate pieces, ensuring the mugs are filled to no more than two-thirds of their capacity. This prevents the cupcakes from overflowing while baking. Note that the batter should not reach the middle of the mug in my case.
- Microwave the cupcakes for approximately two minutes at eight hundred watts. Adjust the timing based on your microwave's power. More powerful microwaves will require less cooking time, and vice versa. Refer to the article linked at the end of the recipe for more microwave insights.
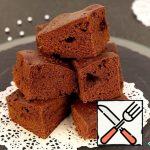
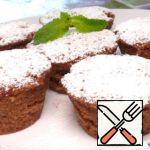
- The chocolate cupcakes should rise and become elastic without burning from the bottom. If they still seem slightly moist after two minutes, extend the baking time slightly. Dust the cupcakes with powdered sugar before serving.


Let me emphasize that not all dishes are suitable for microwave use! Avoid using metal, gold-plated, or thin plastic containers.
These cupcakes can be served either directly in the mugs or separately. Personally, I find that serving them outside of the mugs adds an elegant touch and elevates them into a more sophisticated delicacy! Ultimately, the presentation depends on the impression you wish to create.
Adding a simple piece of chocolate inside these cupcakes works like magic! During cooking, the chocolate will melt, creating a delightful liquid center that will linger for some time. Your guests will surely be pleasantly surprised when they discover the liquid core of these delightful cakes, and few will guess that they are just "cupcakes in a mug"!
Be prepared to adjust the amount of flour as needed, focusing on achieving the desired dough consistency rather than strictly adhering to the recipe's flour quantity.
Remember, microwaves vary in their performance. Cooking times and recommended power levels may differ from those stated in the recipe. Refer to your appliance's instructions and adjust accordingly.
If preferred, you can substitute sugar with a heat-resistant sweetener.
Related posts:
 Chocolate Cupcake in the Microwave Recipe
 Quick Chocolate Cake in the Microwave Recipe
 Chocolate Cupcakes in the Microwave Recipe
 The Cake from the Microwave Recipe
 Chocolate and Banana Cupcake Recipe
 Pumpkin Cupcake with Chocolate and Nuts Recipe
 Chocolate “Stuffed” Cupcake Recipe
 Chocolate Cupcake with Persimmon and Zest Recipe
 Italian Cupcake with Mascarpone and Chocolate Recipe
 Super Chocolate Banana Cupcake Recipe
 Cupcake “Chocolate Chip” Recipe
 Cupcake with Chocolate and Cocoa Cream Recipe