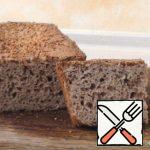
Bread, as you know, is the head of everything. And I really want it to be not only delicious, but also healthy. I offer you two options of homemade yeast-free sourdough bread, which we will prepare ourselves. It is according to this recipe, which was "developed" by trial and error, that I have been baking bread at home for several years and pleasing my loved ones.

| Cook Time | 60 minutes |
| Servings |
|
Ingredients
- 2 kg Flour wheat / Flour
- 500 gram Rye flour
- 2 teaspoons Salt
- 2 teaspoons Sugar
- 2 tablespoons Vegetable oil
- 1 liter Water
Ingredients
|
|
Instructions
- Prepare the food. When preparing the starter, we will not need oil, salt and sugar. These products will be added when we start baking bread.

- Pour 100 grams of rye flour into a liter jar, pour 200 grams of water and mix thoroughly so that there are no lumps. Cover the jar with gauze in several layers and put it in a warm place, without drafts. It is important that the place is just warm, not hot, otherwise our sourdough will sour. Of course, the starter can be made from wheat flour. But from my experience, I can say that the easiest way to "start" this process in the right direction is to use rye flour.

- After about a day, our starter culture should look something like this. Now we add 3 tablespoons with a small top of wheat flour and 50-70 grams of water to the jar. Mix everything thoroughly. The amount of flour and water I indicated approximately. The main thing here is that the starter has the desired consistency. To do this, first pour flour into the jar, and then pour in a little water and mix. As a result, we should have a mass thicker than the pancake batter, and more liquid than the pancake batter.

- The sourdough feeding procedure is repeated several times, with an interval of about 24 hours, and each time we add wheat flour. Sometimes the sourdough for baking bread is ready on the third day, and sometimes you have to wait 5 days. It depends on the quality of the ingredients and the temperature. If the starter culture increases noticeably in volume 2-3 hours after serving, it is all in bubbles, it has a pleasant, slightly sour and alcoholic smell - this means that it is already ready for use for baking bread. The starter culture can sometimes delaminate, this is normal. Before using it, you just need to mix it well. My starter before I kneaded the dough looked like this.

- Pour 9 tablespoons of our starter culture into two containers, add a little less than a tablespoon of vegetable oil, 230 grams of water, warm, from the tap, 1 teaspoon of salt (almost without top) and sugar to each. Mix it. Now add 400-450 grams of rye flour to one pan, and 500 grams of wheat flour to the other. Mix everything thoroughly so that there are no lumps. The dough should turn out a little thicker than the pancake batter. Cover with a lid and put in a warm place.
 and sugar to each. Mix it. Now add 400-450 grams of rye flour to one pan, and 500 grams of wheat flour to the other. Mix everything thoroughly so that there are no lumps. The dough should turn out a little thicker than the pancake batter. Cover with a lid and put in a warm place.")
- Our sourdough has significantly increased in volume and is ready for kneading bread. Now sift the wheat flour into two deep bowls.

- We knead bread with love, kind thoughts and gratitude for all the good that we have. And be sure to get a soft, warm dough, a little more sticky to the hands. Cover with a kitchen towel and put in a warm place.

- Our dough has risen 1.5-2 times. Beat thoroughly, trying to add less flour. Cover again with a towel and put in a warm place.

- When our dough rises again, we carefully knead it again. Lift the edge of the dough and gently shake off the flour with your other hand. And so we move in a circle around the edge of the dough. Place the dough on a cutting board, divide into two parts. Each piece of dough is kneaded until a homogeneous mass is obtained and shaped into an oblong bun.

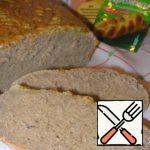
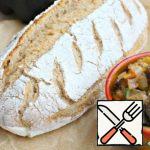
- Since I don't have a bread baking dish, I put the dough on a baking sheet. It should be thick-walled so that the bread is evenly baked and does not remain raw inside. As a result, we get four buns. Cover with a kitchen towel and put in a warm place.

- When the dough rises properly, put it in a preheated oven. Bake at 180-190 degrees for 25-30 minutes. If it is baked unevenly in your oven, it is best to put it in the oven for the first 15 minutes under a baking dish with water. Then take it out and bake the bread until ready. From my own experience, I can say that if you bake bread in such a volume and shape, then you do not need to keep it in the oven for more than 30 minutes. It turns out too dry.

- Remove the bread from the oven and let it cool. At this time, you either need to put paper kitchen towels under the bread, or turn it over several times so that the bottom does not stick. And pour flour and water into the remaining starter again. If you are going to bake bread the next day, you can not put it in the refrigerator. And if not, then be sure to put it in the refrigerator so that the sourdough does not sour. If the starter is stored in the refrigerator, the fermentation process slows down, and you can feed it every 2-3 days. If you bake bread often, the process of "circulation" of the starter will occur naturally. Take as much sourdough as you need, then add flour and water to the jar and put it back in the refrigerator. Even if you don't bake bread often, yeast still needs to be fed 2-3 times a day. When the amount of sourdough is noticeably more than half of the jar, then just drink a few spoonfuls of sourdough before the next serving, and then add flour and water.

- And now Bon appetit!


 and sugar to each. Mix it. Now add 400-450 grams of rye flour to one pan, and 500 grams of wheat flour to the other. Mix everything thoroughly so that there are no lumps. The dough should turn out a little thicker than the pancake batter. Cover with a lid and put in a warm place.")


Related posts:
 Yeast-Free Bread with Cheese and Herbs Recipe
 Homemade Gluten-Free Buckwheat Bread Recipe
 Cheese Chips made of Thin Yeast-Free Pita Bread Recipe
 Yeast-free Apple Pie Recipe
 Yeast-Free Whole-Wheat Cheese Buns Recipe
 Gluten-Free Coconut Pancakes Recipe
 Pancakes on Sourdough Recipe
 Gluten-Free Buckwheat Buns Recipe
 Pies made from the Perfect Lean Yeast Dough Recipe
 Rice-Flax Bread Recipe
 Yeast Dough in the Microwave and Cheesecakes Recipe
 Perfect Farm Bread without Kneading Recipe