
| Cook Time | 120 minutes |
| Servings |
|
Ingredients
Chocolate biscuit:
- 160 gram Flour wheat / Flour
- 30 gram Cocoa powder
- 10 gram Baking powder
- 5 pieces Chicken eggs
- 200 gram Sugar
- 100 ml Milk
- 70 gram Vegetable oil
Cherry compote:
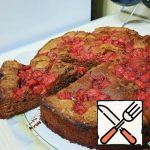
- 300 gram Cherries seedless
- 60 gram Sugar
- 15 gram Corn starch
- 50 ml Water
Cream cheese:
- 600 gram Cream cheese
- 180 gram Butter
- 120 gram Sugar powder
Ingredients
Chocolate biscuit:
Cherry compote:
Cream cheese:
|
|
Instructions
- For the sponge cake: beat the eggs with sugar using a food processor.

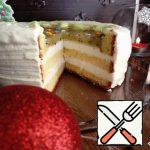
- Pour in the milk and butter. Beat the mass again. Gradually introduce flour mixed with cocoa and baking powder. The finished dough will turn out to be quite liquid, but you do not need to add more flour, otherwise the biscuit will not turn out delicious. Pour the finished dough into a baking dish and bake in the oven at 180 degrees for about 30-40 minutes. check the readiness with a dry wooden skewer. Let the hot biscuit cool, take it out and shape it. Wrap in plastic wrap and refrigerate for at least 12 hours. Cut the sponge cake into 3 cakes.

- To make cherry compote, mix the cherries and sugar in a saucepan. Bring to a boil. Pour in the starch diluted in water and cook until thickened. Remove from the stove and allow to cool completely, tightly covering the mass with cling film.

- For the cream: Whisk the butter together with powdered sugar in a food processor. Add the cold curd cheese and whisk for 1-2 minutes.

- To make the syrup, mix water with sugar and bring to a boil. Remove from the stove and cool. Start assembling the cake. Lay out the chocolate cake and soak in sugar syrup.

- Lay out a little cream, forming the edges of the sides.

- Put half of the cherry compote. Lightly lubricate the top with cream, as if fixing the filling. Cover with a second cake, soak it with syrup, cover with cream again and put the remaining cherry compote. Lay out 3 cakes soaked in syrup. Put the workpiece in the refrigerator for 1 hour.

- Apply a rough coating. Then cover the cake with the cream of the desired color. Carefully level it.

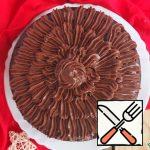
- Decorate the cake with gingerbread, meringue and snowflakes made of mastic. Put the cake in the refrigerator for 3-4 hours. To decorate the cake, I made gingerbread cookies. Enjoy your meal!


Related posts:
 Cake “Christmas Tree in the Snow” Recipe
 Easter Chocolate Cake with Cherries Recipe
 Chocolate Cake with Cherries, Nuts and Spices Recipe
 Trifle with Chocolate and Cherries Recipe
 Cake “Cherry in Chocolate” Recipe
 Chocolate Cake “Prague” Recipe
 Cake “Chocolate Orange” Recipe
 Chocolate Cake with Chocolate Cream Recipe
 Cupcakes with Cherries and Halva Recipe
 Cottage Cheese Cake without Baking “Snow- Covered Berries” Recipe
 Cake “Sweet Cherry” Recipe
 Chocolate Cake with Marshmallows Recipe