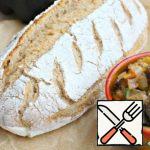
The fastest bread! From the concept to the ruddy loaves about 1 hour, where your participation will be limited to a few minutes. No need to get your hands dirty, wander around for a day, knead, wait for a rise, create heat. Just mix everything with a spoon and send it to a cold oven. Try it and you will love this bread forever!

| Cook Time | 60 minutes |
| Servings |
loaf
|
Ingredients
- 25 gram Yeast fresh
- 800 gram Flour wheat / Flour
- 1 teaspoon Salt
- 300 gram Oat flakes
- 500 ml Water warm
Ingredients
|
|
Instructions
- Take a couple of standard cans (volume 500 ml - water, 750 ml - flour) and a mug of cereal, a quarter of a hundred-gram packet of yeast and a spoonful of salt. If you use scales instead of cans for measurements, the amount of ingredients will be approximately the same: - flour 400 g (+/- 20 g) - flakes 160 g - water 500 g Bread turns out tastier and more intricate with a long cooking time (the cheapest). You can combine different types of cereals, but their total amount should not exceed the prescription.
 and a mug of cereal, a quarter of a hundred-gram packet of yeast and a spoonful of salt.
If you use scales instead of cans for measurements, the amount of ingredients will be approximately the same:
- flour 400 g (+/- 20 g)
- flakes 160 g
- water 500 g
Bread turns out tastier and more intricate with a long cooking time (the cheapest). You can combine different types of cereals, but their total amount should not exceed the prescription.")
- Pour the flakes into a bowl, add salt and yeast. Fill with warm (40 degrees) water.
 water.")
- Stir with a wooden spoon or spatula. Leave on the table for 20 minutes. Subsequently, I began to cover the bowl with a lid so that the water would not cool down so quickly.

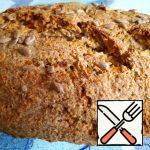
- After 20 minutes, the flakes will swell. So, it's time to add some flour.

- The dough turns out sticky, viscous. There is no desire to touch him. Not.

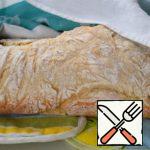
- Prepare the baking dish. Lubricate the iron with silicone, sprinkle it with water. In silicone form, the bread turns out delicious, with smooth barrels, but this form expands during baking, and the bread grows not only up, but also to the sides. Transfer the dough to the mold, moistening the spatula with water, level the top.

- Put it in a cold oven and turn it on at 225 degrees. Bake for 25-30 minutes.

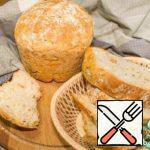
- Cool on the grill, covered with a towel. It can be seen that the loaf has grown almost 2 times and slightly expanded in breadth (due to the silicone mold).
.")
- Immediately after baking, the crust turns out to be very dense, crispy, it is more convenient to cut with a knife-saw. After cooling down, I put what's left of the loaf in a bag, and the next day the bread becomes more homogeneous, the crust is softer, and the crumb is denser.

 and a mug of cereal, a quarter of a hundred-gram packet of yeast and a spoonful of salt.
If you use scales instead of cans for measurements, the amount of ingredients will be approximately the same:
- flour 400 g (+/- 20 g)
- flakes 160 g
- water 500 g
Bread turns out tastier and more intricate with a long cooking time (the cheapest). You can combine different types of cereals, but their total amount should not exceed the prescription.")
 water.")


Related posts:
 Oat Bread with Buckwheat Recipe
 Wheat-Oat Bread with Dry Herbs Recipe
 Cottage Cheese-Oat Bread Recipe
 Bread without kneading Recipe
 Airy Potato Bread Recipe
 Garlic Bread with Herbs Recipe
 Bread “Buchteln” Recipe
 Perfect Farm Bread without Kneading Recipe
 Jelly Oat Sea-Buckthorn-Orange Recipe
 Vegetable Cutlets with Oat Flakes Recipe
 Apple Pie with Oat Flakes Recipe
 Australian Vegetable Bread Recipe