Why "cold fermentation"? Yes, this is a more professional method and is not often used in home kitchens. But it has several advantages. First-the taste of the dough itself. For a day or two in the refrigerator, the dough matures and the taste improves.

| Cook Time | 90 minutes |
| Servings |
|
Ingredients
Dough 1:
- 1000 gram Flour wheat / Flour 100%
- 20 gram Sugar 2%
- 20 gram Salt 2%
- 1 gram Basil 0.1%
- 1 gram Oregano 0.1%
- 6 gram Yeast dry 0.6%
- 600 gram Water 60%
- 90 gram vegetabe oil 9%
Dough 2:
- 500 gram Flour wheat / Flour 50%
- 500 gram Whole grain flour 50%
- 30 gram Sugar 3%
- 20 gram Salt 2%
- 1 gram Basil 0,1%
- 1 gram Oregano 0,1%
- 6 gram Dry yeast 0,6%
- 620 gram Water 62%
- 90 gram Vegetable oil 9%
Flattening the mixture:
- 2 glasses Semolina
- 1 glass Flour wheat / Flour
Ingredients
Dough 1:
Dough 2:
Flattening the mixture:
|
|
Instructions
- Mix all the dry part in a bowl. Nuances: the flour must be sifted. Yeast - if dry, throw in flour, if pressed-dissolve in water. Salt - if small, send to the flour, if large-dissolve in water... I want to say a couple of letters for flour: all this recipe is "sharpened" for our average flour, which is available throughout the post-Soviet space. Not imported strong, not Italian for pizza. It is under our.

- Pour in the water and knead the dough. Nuances: the water should be cold! At enterprises, there is a formula for calculating the water temperature depending on the temperature in the kitchen, the temperature of flour and several other indicators.. In the home kitchen, it is not even necessary. It is enough to know: in the summer, we cool the water in the freezer until an ice crust appears, in the fall and spring, we simply cool it...

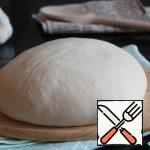
- Knead the dough. Oil can be added immediately, but this is not good! Usually I do this - I start kneading with a spoon, and then just pour the oil a little bit on my hand and gradually mix it into the dough... Knead until "smooth". Minutes 10 ... 12. Please note-with such a degree of hydration of our flour, the dough will still stick to your hands. And to the table. Another point: kneading the dough on ice water requires physical effort. At the very beginning, you will probably think that the dough is "oak". Do not rush to conclusions - finish it to the end. Also, with manual kneading, it is unlikely that you will be able to knead the dough to the same state as in the dough mixer. Don't bother! 10 minutes by hand-enough for 2, 3 pizzas. If you will knead in the car-I can tell you the time only for the spiral dough mixer. 18 minutes. In general, for machine kneading, there are a couple of indicators of dough readiness: the dough begins to "click"at the end of the kneading. Air bubbles burst and it turns out such a shooting sound. The dough should not spread out on the bowl or bowl of the machine, but should be collected in a lump around the working mechanism. A few words about flour: although we have it all weak, but a small +\- still there. If you decide to prepare the dough according to these recipes-I advise you to do it clearly for the first time according to the layout. It will not be hard in any case, and if it turns out to be too soft-sticky - reduce the next time by 3...4 percent of water.

- We cut the dough into the desired blanks. Nuances: Guys, you need to include math here. For a pizza with a diameter of 30 cm, a ball of dough in 260 g is enough. This is enough for a cook who knows how to stretch a side pizza on a flour mixture. For the "amateur" I can recommend 300 grams to start with... This pizza will be slightly thicker, but you will not break (hopefully) the dough during rolling and will feel more confident... Over time and experience rolling out grams can be slowly reduced...
 the dough during rolling and will feel more confident... Over time and experience rolling out grams can be slowly reduced...")
- Pour a little oil on the table. Flatten the dough with an open palm in oil and pull it from the edges to the middle, pressing the middle of this "pancake" with your finger...

- Roll the balls on the dry part of the table...

- We put it in suitable boxes, carefully lubricate with oil and send it to the refrigerator for about half an hour... Here I want to say a few words about lubrication: do not hesitate to do it with your hands! The top can be smeared with a brush - and then-3 fingers in vegetable oil - and thoroughly iron, massage,lubricate the workpiece with your hand...

- Remove from the refrigerator and carefully wrap the film. Severiana - worst enemy test in our case! In general, this technique is necessary to ensure that less condensate is collected in closed boxes, and accordingly there is less humidity.

- After a day or two, it's baking time! The workpiece is removed from the refrigerator and thoroughly bathed in the flour mixture. You can roll the dough on different mixtures. It is possible on whole-grain flour, it is possible on semolina, sometimes stretch on vegetable oil. I like it better on a mixture of semolina and flour. Give 30 minutes to warm up on the same mixture or on the table...

- Pour the mixture on the table. The workpiece is slightly flattened with the palm of your hand, maintaining a round shape. We plan the sides. Just squeeze out the "circle" with your fingers at a distance of 1 cm from the edge of the workpiece. This is not necessary at all. After a few hundred rolls, the cooks stop doing such nonsense, but it's easier for beginners...

- The fingers of the left hand pull the dough forward, the fingers of the right-slightly forward and sideways at the same time. Slightly scroll the blank and repeat the movements. Of course, it is difficult to explain this clearly with the help of photos. Therefore, as I said above, I will show a small video of this process in my diaries...

- We spread the blank on what we will bake and collect pizza. At home I do not have a hearth stove, so I get out of the situation in a fairly simple way - I pour a pack of salt on the pallet and warm it up well in the oven. I collect the pizza on a silicone mat, then carefully transfer it to hot salt and send it to the oven.

- In my small oven, I bake at 300 degrees on two heating elements for exactly 12 minutes. Here's the result! Bon Appetit!


 the dough during rolling and will feel more confident... Over time and experience rolling out grams can be slowly reduced...")


Related posts:
 Lush Pizza with Spinach Dough Recipe
 Vegetable Pizza on Beet Dough Recipe
 Thin Pizza Dough Recipe
 Dough for Very Thin Pizza Recipe
 Pizza-tart with Baked Pepper Recipe
 Pizza Dough of Squash Recipe
 Open Pie-Homemade Pizza Recipe
 Pizza with Shrimp and Cheese Recipe
 A La Pizza with Pumpkin Recipe
 Unusual Pie Pizza Recipe
 Pizza with Smoked Bacon Recipe
 Yeast Dough in the Microwave and Cheesecakes Recipe