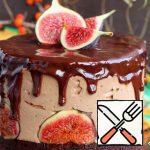
The cake was a success. A delicate, airy cream, a good sponge cake, I like the combination - a little sponge cake + more cream in this cake is just what you need. It looks cute. And the complexity of the execution is quite feasible to work with this cake was fun!

| Cook Time | 300 minutes |
| Servings |
|
Ingredients
Sponge:
- 150 gram Flour wheat / Flour
- 200 gram Sugar
- 4 pieces Chicken eggs
- 50 gram Cocoa powder
- 50 milliliters Water hot
- 50 milliliters Vegetable oil
- 8 gram Baking powder
- 8 gram Vanilin
- 1 pinch Salt
Cream:
- 500 gram Mascarpone
- 500 milliliters Cream (33%)
- 150 milliliters Milk
- 150 gram Sugar powder
- 20 gram Gelatin
- 8 gram Vanilla sugar
- 3 tablespoons Cocoa powder for decorate
Ingredients
Sponge:
Cream:
|
|
Instructions
- Flour, cocoa powder, baking powder - sift everything and mix.

- Separate the yolks from the whites. Whisk the whites with a pinch of salt, then gradually adding 1/5 of the sugar, until peaks form. Whisk the yolks, add hot boiled water, vanilla sugar, remaining sugar, whisk until light.

- Gently mix the yolk-protein mass, add the flour mixture, mix thoroughly, at the end - vegetable oil.

- Form 26 cm, cover the bottom with baking paper, pour out our dough, scroll the form with the dough so that the dough is distributed more evenly, bake at 180 gr. 40-45 minutes. Cool. Cut off the top, leaving the bottom of the cake about 2 cm.

- Then move on to the most interesting. Circle "Crazy hands". It is necessary to cut the lower part of the biscuit into "circles" - about 2 cm, you can use improvised means (plates, other shapes, etc.), I do not regret that there is no compass. I took baking paper and drew circles on it, then, attaching the mold to the biscuit, cut out the necessary circles.
, I do not regret that there is no compass. I took baking paper and drew circles on it, then, attaching the mold to the biscuit, cut out the necessary circles.")
- Thus, the biscuit should be divided into two parts consisting of several circles.

- Prepare the cream: Soak the gelatin in cold milk. Whisk cottage cheese with vanilla sugar, with most of the powdered sugar. Gelatin is heated until dissolved, mixed with the curd part. Whisk the cooled cream with the remaining powdered sugar until thickened. Gently mix the two parts so that the cream does not lose its splendor and lightness.

- We cover the split form with cling film, put our cut-off top there. Lubricate our "top" with cream, spread the first layer of "sponge circles".

- Pour in the cream.

- Then lay out the second layer of sponge cake, also pour the cream.

- Also pour all the cream, lubricate the top, put in the refrigerator until solidified. It took me a couple of hours to freeze. Take out the walls of the mold, carefully remove the film, transfer to a plate.

- The circle of "Crazy Hands" continues. Cut strips of Shire from paper. 2 cm. Put them on top of the cake. After one - remove the strips. Now we also lay across the strips, take them out through one. There should be squares between the stripes.

- There should be squares between the stripes.

- Sprinkle them generously with cocoa powder through a strainer.

- Carefully remove all the strips. This should work. So that:

- Then the new strips are placed on squares with cocoa, thereby closing them.

- And also across to do. Repeat the procedure with sprinkling. We also carefully remove our strips.

- Admire the result.

- Actually, our pie is ready. Enjoy your meal!


, I do not regret that there is no compass. I took baking paper and drew circles on it, then, attaching the mold to the biscuit, cut out the necessary circles.")


Related posts:
 Chocolate Cake with Marshmallows Recipe
 Strawberry Cake “Chance” Recipe
 Chocolate-Coffee Cake with Mascarpone Recipe
 Sand Cake with Condensed Milk, Fruit and Chocolate Caramel Glaze Recipe
 Cake “The Old Tuxedo” Recipe
 Cake “Currant-Coffee Delight” Recipe
 Strawberry Cake with Mascarpone Recipe
 Cake “Autumn Waltz” Recipe
 Souffle Cake with Honey Ganache and Figs Recipe
 Cottage Cheese Mousse Cake with Strawberries Recipe
 Cake with Almonds and Cream Souffle Recipe
 Cake “Milk Slice” Recipe